Thursday, September 20, 2012

My Wedding Stationary

I wanted to write a blog entry about all the stationary I made for my wedding, not only to share with you guys, but also for myself as a keepsake.

There was never really a point where I remember making a conscious decision that I was going to do ALL things stationary for my wedding - it just sort of happened.  And the best part about it, was that it saved me a lot of money to be able to spend on other parts of the wedding!  Naturally, the first thing I started with was the Save the Dates.  I went to Michael's and shopped for some paper in my wedding colors.  The "pink" paper that I bought is really what set the tone for the whole wedding theme.  This became THE pink that I wanted everything to match.  I searched online for some ideas and when I found "the knot" idea I fell in love.  Here is how it turned out:

 The next thing I tackled was the invitations - and oh my goodness, I don't think I realized what a project I was in for!  I knew it was going to be daunting, but WOW.  I made nearly 100 invitations and each one contained 3 different cards that were all double matted.  There were 10 layers in each invite!  I got the idea from my best friend's wedding that was about 10 months before mine.  I love how it turned out!


This was something like 800+ pieces of paper!!


After the invitations were sent out (and the huge weight off my shoulders was lifted) I started working on the Programs.  These too were pretty daunting, but much easier than the invitations, and I had my sister, Mackenzie's, help!  These sat on every other place setting at the reception, and were one of my favorite details!


After those three intense projects were over, the rest was just a bunch of onesie, twosie smaller projects.  I made my bachelorette Party and Bridal Shower invitations.  I suppose those should be done by the person throwing the party, but I'm such a perfectionist that I wanted to do it myself lol.  Plus, I really enjoy doing it and being able to say I made them myself :)


One of my favorite wedding stationary projects was my table numbers!  This was such a fun idea that I actually came up with on my own! haha.  Most of my "ideas" are actually other people's ideas that I recreate, but this one I can actually say I created!  I probably saw something similar online and applied it to my TV Show theme.  So the way it worked was, I had a big crystal tree on the outside cocktail deck that had big paper "ornaments" hanging from it.  Each one had the name of a couple from a famous TV show and underneath that were the names of the guests that would be sitting at that table in the reception.  Then once they entered the reception, they were to find the table with the name of the TV show that featured the famous couple.  That's the table they would sit at :)  Such a fun activity for the guests and something for them to talk about during cocktail hour while they waited on us to finish our pictures.  I matched up the age of the guests at a particular table with a TV show that was from their generation.  Some of the shows I had were Saved by the Bell, Married with Children, The Flintstones, Home Improvement, The Simpsons, The Brady Bunch, and many more!


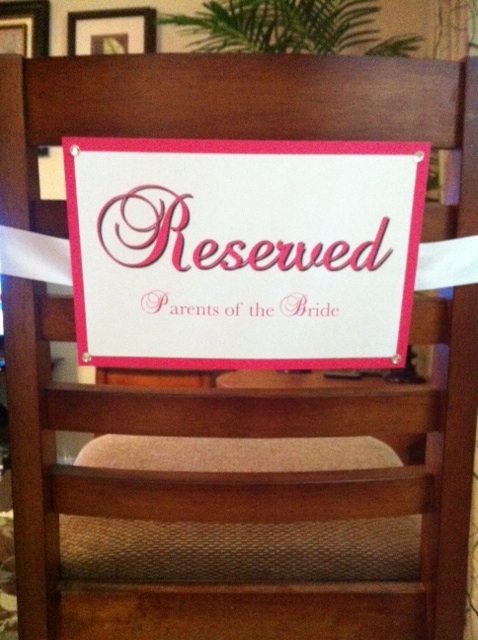
I made these Reserved signs for a bunch of the chairs at the ceremony for mine and Ryan's immediate family.

These were the gifts I gave to my bridal party.  I bought the earrings and bracelets from a jewelry store and then put them on my own, personalized paper with their name and a cute note.  I also put them in a matching box that had their name on it as well. They all loved them, by the way :)


Here's a picture of all my wedding stationary together!


And finally, after the wedding and after coming back from our European Honeymoon, I had ONE  LAST PROJECT!  The Thank You notes!  I used a picture from our wedding taken by our awesome Photographer and made it into a card.


And that was it! I was finally done!  And believe it or not, I miss it a lot.  The year before my wedding was so fun, so busy, and very exciting getting to do what I love getting ready for the best day of my life!


Monday, August 20, 2012

Canvas Picture Tutorial

My little sister moved to Gainesville this past weekend for college and I wanted to make her a couple of pictures that she could hang in her new apartment bedroom.  Not sure where I came up with this idea but I just went to Joann and started buying supplies!  I took pictures while I put them together so I could share :)  Enjoy my canvas picture tutorial!

Supplies:
Two 16x20 Canvas'
1 yard Background fabric
1/2 yard Border fabric
Decorative trim
Needle & thread
Decorative Straight pins
Cardstock paper
Hammer
Small nails

I started with two plain canvas' that are 16x20 in size.  They were on sale for $7.49 each.


I searched through all the fabric for anything gray and yellow and found some floral print fabric for $10.99 a yard.  I bought 1 yard.  I cut a square around each canvas, leaving about 3 inches on each side.  I placed the canvas face down on the back side of the fabric so I could wrap the fabric around the edges and nail it down.


I used a hammer and some small 1" nails and nailed the fabric to the wood edge of the canvas.  I nailed them at an angle so they didn't poke out through the front but I suppose shorter nails would have worked better.  That just happened to be what I found in the house :)


When it got to the edges I put one nail about 1-1.5" from EACH side and then folder the fabric over tightly and put a third nail in to secure the extra fabric.


Then I used a 1/2 yard of plain gray fabric that was around $7/yard.  I cut a square for each canvas that was about 10.5"x12.5" and laid it evenly in the middle.


I didn't do anything to attach the gray fabric to the fabric on the canvas.  What I did was took the gold decorative trim and placed it on the edge of the gray fabric to cover the edge where it met the floral fabric.  Then I took needle and thread and unprofessionally wove it through the trim, attaching the trim to the gray fabric to the floral fabric.  Just an FYI I've never sewn before so this was nothing fancy!  I used yellow thread that matched the trim so you couldn't tell how awful my sewing was.


Once all the trim was sewn on, all I did was attach an 8"x10" piece of black cardstock centered in the middle with straight pins at the corners.  These straight pins already had a pearl attached to the end which added a nice touch.  From there I just centered a black and white photo I printed from my computer and taped it to the black cardstock.


This is the finished product!


And this is the finished finished product!


And here's how they looks in hew new college apartment!


Yay! What do you think?  Let me know if you have any questions about my tutorial :)

~Linds

Saturday, August 11, 2012

Year Old Cake

This past Monday was our 1 year wedding anniversary and we, of course, executed the tradition of saving the top layer of your wedding cake to eat on your first anniversary.  I was so excited and had been waiting for this for a long time since I didn't remember AT ALL what our wedding cake tasted like.  The wedding was such an overwhelming whirlwind that unfortunately I didn't remember the cake ceremony, except for there being lots of eyes on us and cameras in our face.

So needless to say I did it up, complete with our engraved cake knife and server, champagne glasses, and even put the cake topper back in the cake.


I made the first cut and Ryan made the second.  It was pretty difficult to do everything at the same time and still be able to get the pictures that I wanted :(


Had to get a picture of our rings while we cut the cake :)


The first slice!


Him feeding me.  Except this time I wasn't as worried about him rubbing it on my face at the wedding.  To be honest, that's actually one of the things I remember best.  Yelling at Ryan to NOT smash it in my face, even though that's what we had agreed to before the wedding.  But for whatever reason, when that moment came, I was NOT going to mess up my makeup on my wedding day for crying out loud! haha


His bite!  After his bite he proceeded to say "you know they sell pound cake at Publix right?"  Boy was I upset and responded with "This is NOT pound cake!! It's amaretto cake from an Amazing bakery and it cost a lot of money!" haha.  MEN!!!


I poured red gatorade into my champagne glass, and he, orange juice.  It was a work night ok! :)  We made a toast after our first bite of cake.


And of course I had some more cake....so delicious!! Even after a year in the freezer! :)


All done! *** Cheers to many more years with my amazing husband ***