One of our bedrooms, which started off as a spare bedroom, eventually became my "office". I posted a while back about how I sent an application to HGTV to get a home office makeover. I do lots of crafts, scrapbooking, projects and spend lots of time in there and wanted it to be cute. But for months I struggled with the idea of spending money on a room that may not be able to remain "my office" for very long. If we have kids one day, I will most likely have to give this room up for them, and not like I will have any more time for crafts and things anyway once I have kids, haha. So after months of thinking about a way to convince my husband to let me spend the money to makeover my office, I finally got it. I was going to design a room that could be my office for now, but be easily converted to a child's bedroom in the future. I strategically picked the wall color, and furniture so that it could all be kept the same for a kids bedroom.
So here's what it started out like as the spare bedroom (barf):
After this is when I decided to makeover one of the other bedrooms into the spare bedroom and have this one become my office. You can see my blog post on the purple room :)
So here it is once I turned it into my office. It was basically just a bunch of random furniture that didn't have anywhere else to go with some of the old decorations. It was a hot mess.

So I first organized/threw away a bunch of my stuff to condense it and move everything out. I'm still trying to sell the brown bedroom set and I threw the fold up tables in the garage to use if needed. The first thing I did was replace those awful vertical blinds. As you can see half of them were missing and they kept falling off. I got some nice venetians from Home Depot and also got some paint. I picked a soft orange, sorbet-y color. As I mentioned above, this was a very strategic decision. First of all, I love the color orange (maybe it has something to do with going to UF :) ), second of all, if I ever had a girl in the future, I could add some pink to the room and it would work. And if I ever had a boy, I could add some blues and greens and it would also work. So that was my thinking with the color.
So here's what it looked like after the new venetians and paint:
So I began to design the furniture for the room. I obviously knew I was going to get it from Ikea because I love the modern styles and cheap prices. There was an office room they had on the showroom floor that I fell in love with. All of the furniture was from the "Effektiv" line. So after drawing it up and planning on that, I went to Ikea to buy it all and found it it was discontinued. Talk about heartbroken. So back to square one. My second choice was the "Besta" line. What I loved about it was how customizable it was. You picked the cabinet size, the leg size/type, the door you wanted, the handles, etc. You can literally make whatever you need to fit your need with this line. And looking back, I'm probably happier with this line than I would have been with the other one. Not to mention it was cheaper (win!). So I drew it up on paper how I envisioned it looking:
So I bought all the cabinet pieces and started putting them together. And NO my husband didn't help for all of you who like to assume :)
I went with white because I thought it was fresh, modern, bright, and also would be good for a kids room. Glad I didn't go with my original color of "birch". Don't know if it would have looked as good. Bruiser liked to keep me company while I built it all:
Here's the first section done
And even though I wasn't completely done with the furniture, I couldn't wait to start decorating, so here are the first few pieces I bought. The two flower pictures under the shelves were actually my inspiration pieces for the whole room. I saw them at Home Goods for $20 and loved the colors in them so I decided that's what I was going to use throughout. Because honestly, even though I had the orange walls and white furniture, I didn't know where I was going with it after that.
I saw the clock at Bed, Bath & Beyond as part of their "back to college" stuff for only $14! The ends of each hour arm are actually paper clips that you can attach things to, which I thought went perfect for my "office" theme. The lamp is just staged from my spare bedroom, the real one I ended up buying for this room was from Ikea for $19.
Here's the clock again up close after I added the numbers to it myself:
I decided my old TV fit perfectly in the open spot I left in the cabinet. Like I said, the cabinets were completely customizable so I wanted to leave an open section in each one as kind of a display area and a space to add color to break up all the white.
This is me messing around with colors and decoration for the shelves. (Don't get me started on how hard those shelves were to hang. Stud finders, levels, screw driver, ughhhh. All by MYSELF if I forgot to mention.) I already had a lot of the glass vases leftover from the wedding and whatnot so I decided to throw some colored paper in them to match the room :) Definitely a cheap design idea.

During one of my 15 trips to Bed Bath & Beyond, I saw these curtains. I knew I wanted white panels for the room, but didn't want them to be so plain. I originally thought I was just going to end up with some white panels with texture since I never knew I'd be able to find THESE. They were absolutely perfect in my mind, even though they were far from it when I saw them in the store. The flowers on them were black and taupe. The black parts were fine and would match, but I thought about what I could do to the taupe ones, when it hit me that I would just Sharpe them :). Yup, I brought them home and used my 30 pack of sharpes and colored the taupe flowers red, and orange and green to match the rest of the colors in the room.
Here's what they looked like before I colored them. You'll see the after picture later.
So I went back to furniture building and decorating the rest. I bought some cheap white & red frames at Ikea for only a couple bucks to add around the room. I bought 2 white frame mirrors for only $5 each for the other wall. (They are the same ones I used in my spare bedroom). I also bought some circle sticky mirrors from Target for $10 to add interest. Like I said, all the vases I already had around the house and just added colored paper and bought some silk flowers at Joann on clearance since they were out of season.
I found a paper clip wall art thing at Bed Bath ($14) as well and freaked out when I saw how amazing it matched my new clock. I bought two of them and hung them together on top of each other to make it bigger.
I had been wanting a new chair to add a splash of color in the middle of the room but didn't want to spend much money because technically I already had a chair and didn't really "need" a new one. Except that it was black and I didn't "want" it lol. So I found this bright green one at Ikea and knew it was the one. Only $24.
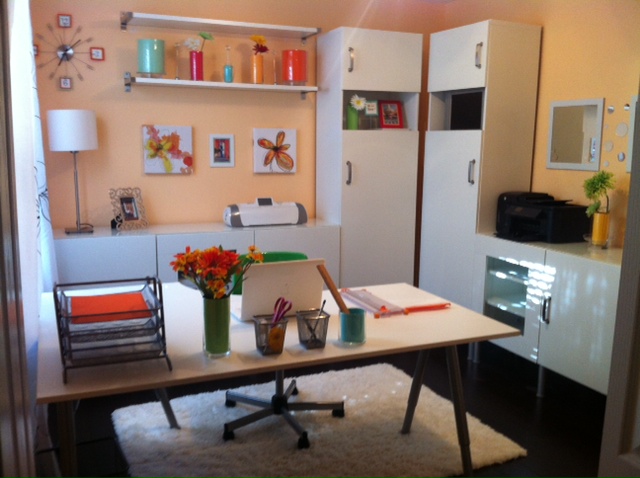
I bought the same rug that is in my spare bedroom because it just looked so good in here as well, and all that was left was the desk! I got it from Ikea for only $140 and spent a few bucks on the desk accessories at Ikea as well. Here is the finished product! :)
So in the future, my plan is to just remove the desk and replace it with a crib! All the cabinets will be able to be used for the baby, whether it's diapers, toys, clothes, etc. and I'll just add a few new decorations depending on the gender and wah-la! Let me know what you think!
Linds